pot

The Oregon Hole

Click for Branch Tips index

For those of you who tuned into last Saturday’s Zoom session on winter care, here is the article that I promised. One of the challenges of winter care that we talked about was the fact that it can rain incessantly during our Oregon winters, to the point of compromising the health of our trees. This can be especially true during our wet springs and just after repotting.

One way to combat that challenge is to tilt the tree up on one side so that you increase the height of the water column inside the pot, which will drive the water out. As Andrew Robson noted in our Zoom meeting, be sure to switch sides once in awhile or you will start developing a one-sided root system. There is only one hitch in this scenario. You have to have a hole in the right location to drain all that water out. Sometimes you have one, and sometimes you don’t.

202012_01.jpg

Most contemporary American potters, like our own Vicki Chamberlain and Nao Takutake are adding many holes to the bottom of their pots for both drainage and anchoring, which is an ideal situation.

But many older and imported pots don’t have those holes. Many of the antique Chinese pots that are so valued in the bonsai world have just one single, large hole in the middle of the pot. Making things worse, they often sagged before firing, when drying upside down, so the middle of the pot is raised creating quite a swampy environment for our bonsai.

A couple of years ago I started adding what I call the Oregon Hole to my pots. That is, one small diameter hole on each side of an ovular or rectangular pot, which will end up at the bottom of the tilt. I have been adding holes to my pots for many years to anchor trees down. This is pretty much the same technique, with just size and placement that varies.

The most important thing to consider is that we are drilling through stone – usually high-fired clay, which is super hard. To get through that material, you need specialized drill bits. I have been using spade shaped glass and tile bits for many years with great success. After this Saturday’s Zoom, I decided that I had better try a diamond studded bit. Here is what I have found about both.

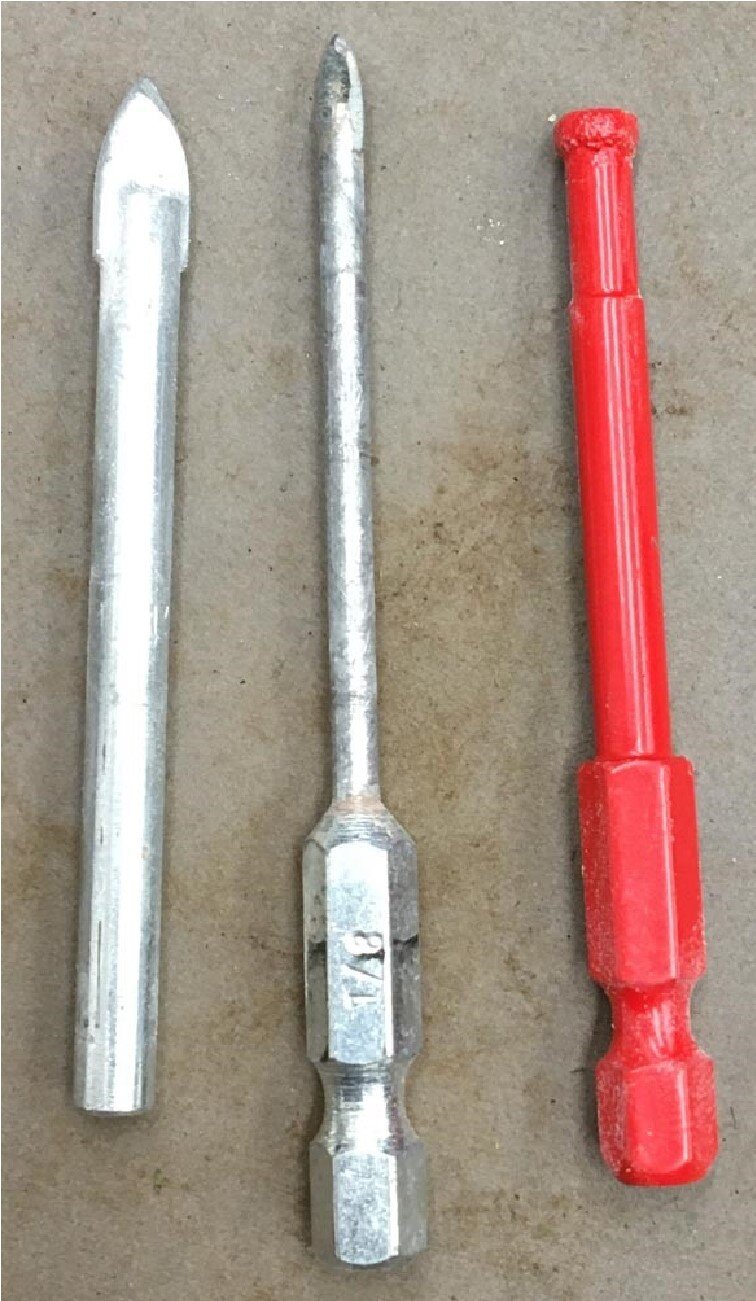
Left to right: 1/4“ spade bit with straight shaft, 1/8” spade bit with quick load, 3/16 diamond tipped bit  

Diameter is everything. This is really hard material that we are drilling through, so make the hole only as big as you need to. I often drill a hole only one eighth inch in diameter if I need to just pass an anchor wire through a container. Enlarging the hole to just a quarter inch is really about four times harder to drill. You get the picture. Strategy comes to play here also. Anything above a quarter inch and the soil will fall through, so I would have to add a screen to it, making more work. So, for my new diamond bit, I chose 3/16” size to make sure my soil stays intact.

202012_02.jpg

The glass and tile bits come in two shapes. One is angled but with flat sides, the other, the spade bit, is rounded to a point and is what I prefer. I have not noticed a difference in brand and as you can see in the photo, I have both straight shaft and quick load versions. The one thing you absolutely do not want is a concrete bit, shown in the photo. It is easily identified by the flanges protruding beyond the shaft.

They are designed to be used by a hammer drill to pound concrete to powder. We have to be much more delicate with our high-fired bonsai pot clay. The spade bits do break occasionally, and they do dull. I would armor yourself with more than one, because they will break at the most inconvenient time – like when you already have a tree bare rooted and waiting for its new home. I use spade bits to quickly add holes to high-fired Japanese terra cotta training pots. These pots are much harder than conventional Italian terra cotta, but softer than high quality bonsai pots and the spade bits go through these like butter. I have used the spade bits on bonsai pots with varying results. They almost always work, but the pots seem to vary greatly in their hardness.

Diamond bits are a newer arrival but they work great. You can get them in just about any size, and if you want anything larger than about a quarter inch, they are your only option. They work by having the diamonds glued around the tip of a circular shaft, so you are really cutting a ring. At our small size, that is really insignificant. The good thing is that they cut more reliably than the spade bits, and gives us another option.

Concrete bit

202012_03.jpg

Korean pot ready to drill

I took this opportunity to make a bit-to-bit comparison between spade and diamond bits on a pot that could use some holes. This is an older Korean pot with walls maybe a quarter inch thick and very hard. I cleaned the pot first and then proceeded.

Taking Andrew’s hint from Saturday, I placed a piece of duct tape on the back side of the hole to be drilled to prevent blow out. With the diamond bit, it is better to start at about a 45-degree angle and grind a small hole to start the bit and then work yourself to a full vertical angle. I always have a water spray bottle to lubricate and cool the drill bit. I only needed to spray once and the bit went through in a minute or two of work.

Switching over to the familiar spade bit, I could go straight in because of the pointed tip. However, progress was very slow. To be fair, the bit was used quite a bit, and slightly larger in diameter, but I have to say that the diamond bit worked much better on this harder clay.

202012_04.jpg

Drilling in progress

202012_05.jpg

New hole

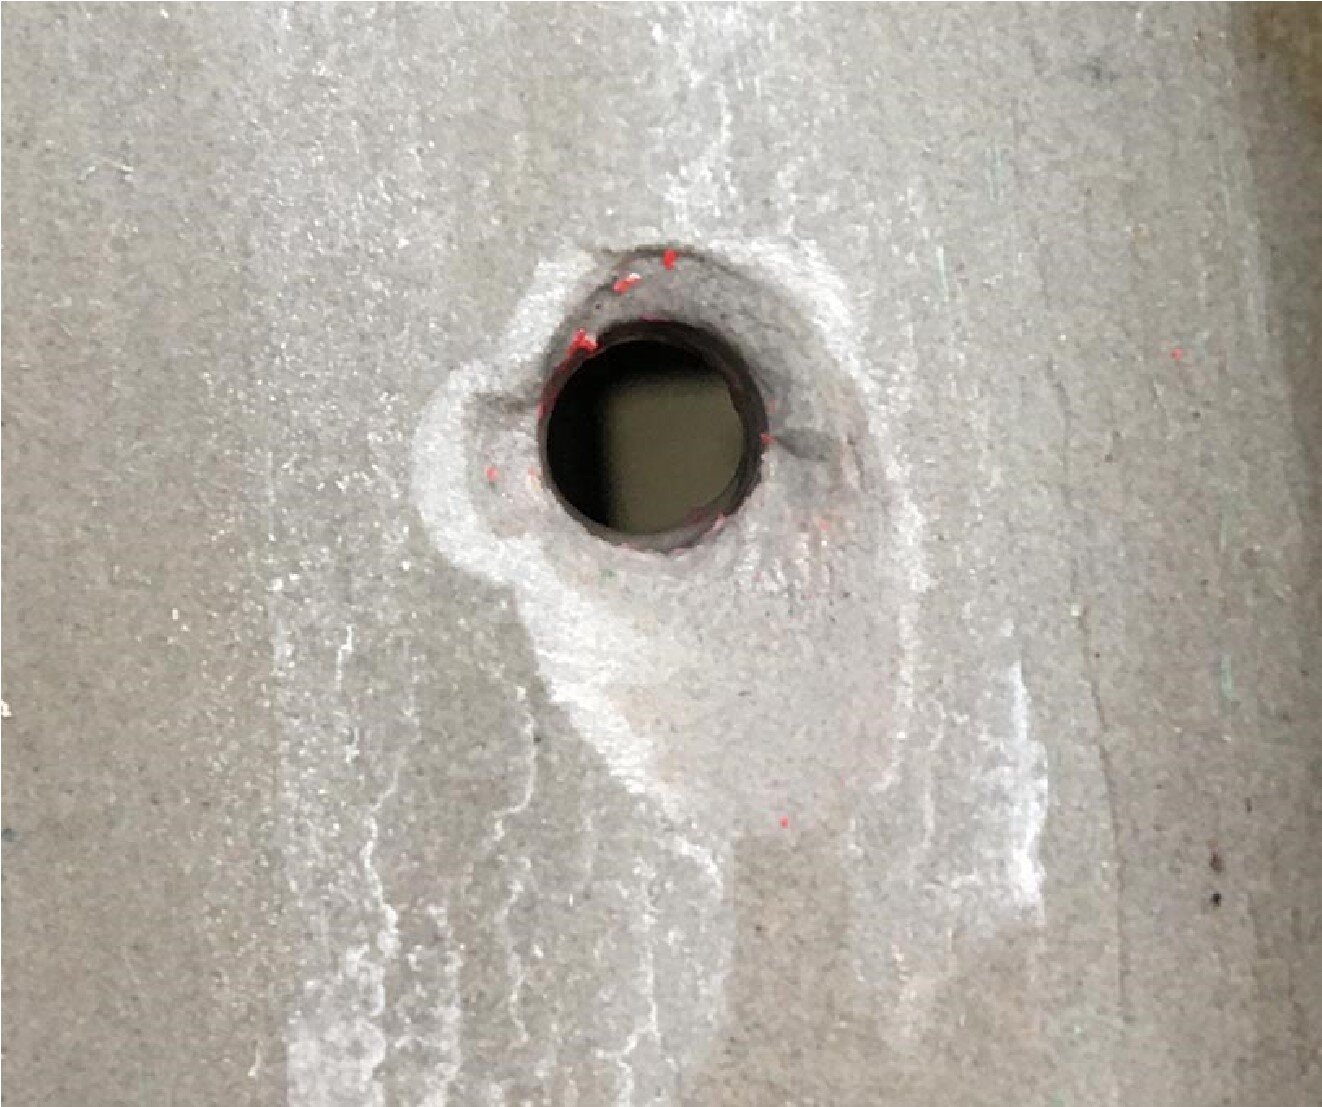
At that point, I just switched to diamond bit to finish things up. This hole did have some blow-out, as pictured, but I did not use the tape on it, wanting to compare the difference. The technique to prevent blow-out for a spade bit is to listen for the change in pitch as you are drilling. This sound change means that the bit has reached the other side and is starting to emerge. Stop immediately and begin drilling from the back side. Though it is not exactly that easy to execute on a softer pot, when I am drilling fast and hard, I usually don’t care on those. But you can try the duct tape trick.  

Blow Out

Blow Out

It was also mentioned that you can drill under water, but this gets operationally a little tricky. It’s unneeded in most circumstances, but might work nice if you have a lot of pots of the same size to drill. This whole process makes a great winter project so that you are ready to go for spring repotting.

Happy Drilling, Scott Elser

Triple Trunk Redemption

Click for Branch Tips index

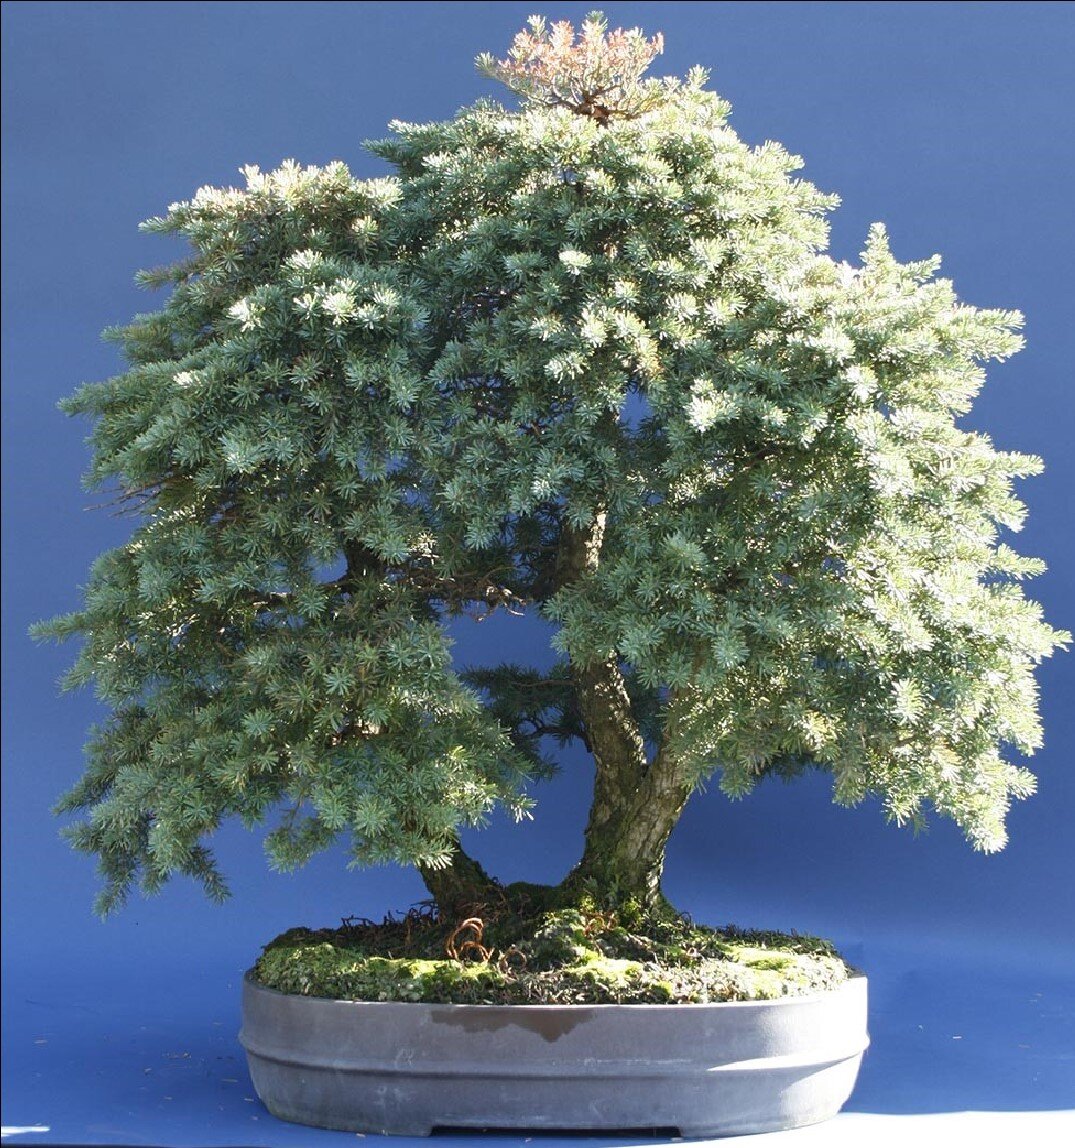
Many years ago, early into my bonsai journey and my attachment to BSOP (those two are nearly concurrent), I encountered a tree which held me rather spellbound. It was a triple trunk Mountain Hemlock (Tsuga mertensiana) from club member Edris Stryker. Edris was a die-hard member of BSOP for many years and lived in Longview, Washington. She and her husband Ralph regularly made the trek to Portland for meetings and Edris shared her trees at every show. Ralph was a timber cruiser by trade, so they made it into the hills quite often, I think. This tree ended up coming home from one of those excursions. 

april01.jpg

As her bonsai career began to wind down and she had to find new homes for her welldeveloped collection, a few folks were interested in this tree, among them her son and myself. Since her son did not do bonsai, care of this tree was entrusted to me, somewhere around 2002. Yes, much longer ago than I might have imagined. 

I have many bonsai now from Edris, and for every single tree, my first task was to repot each into a new container. That usually meant a vessel significantly larger than its current home. For this particular tree, it went into an oval, which meant I had to round the corners so to speak. I don’t have a photo available for what it was like when I first received it, but it was in a generic rectangle from Japan. 

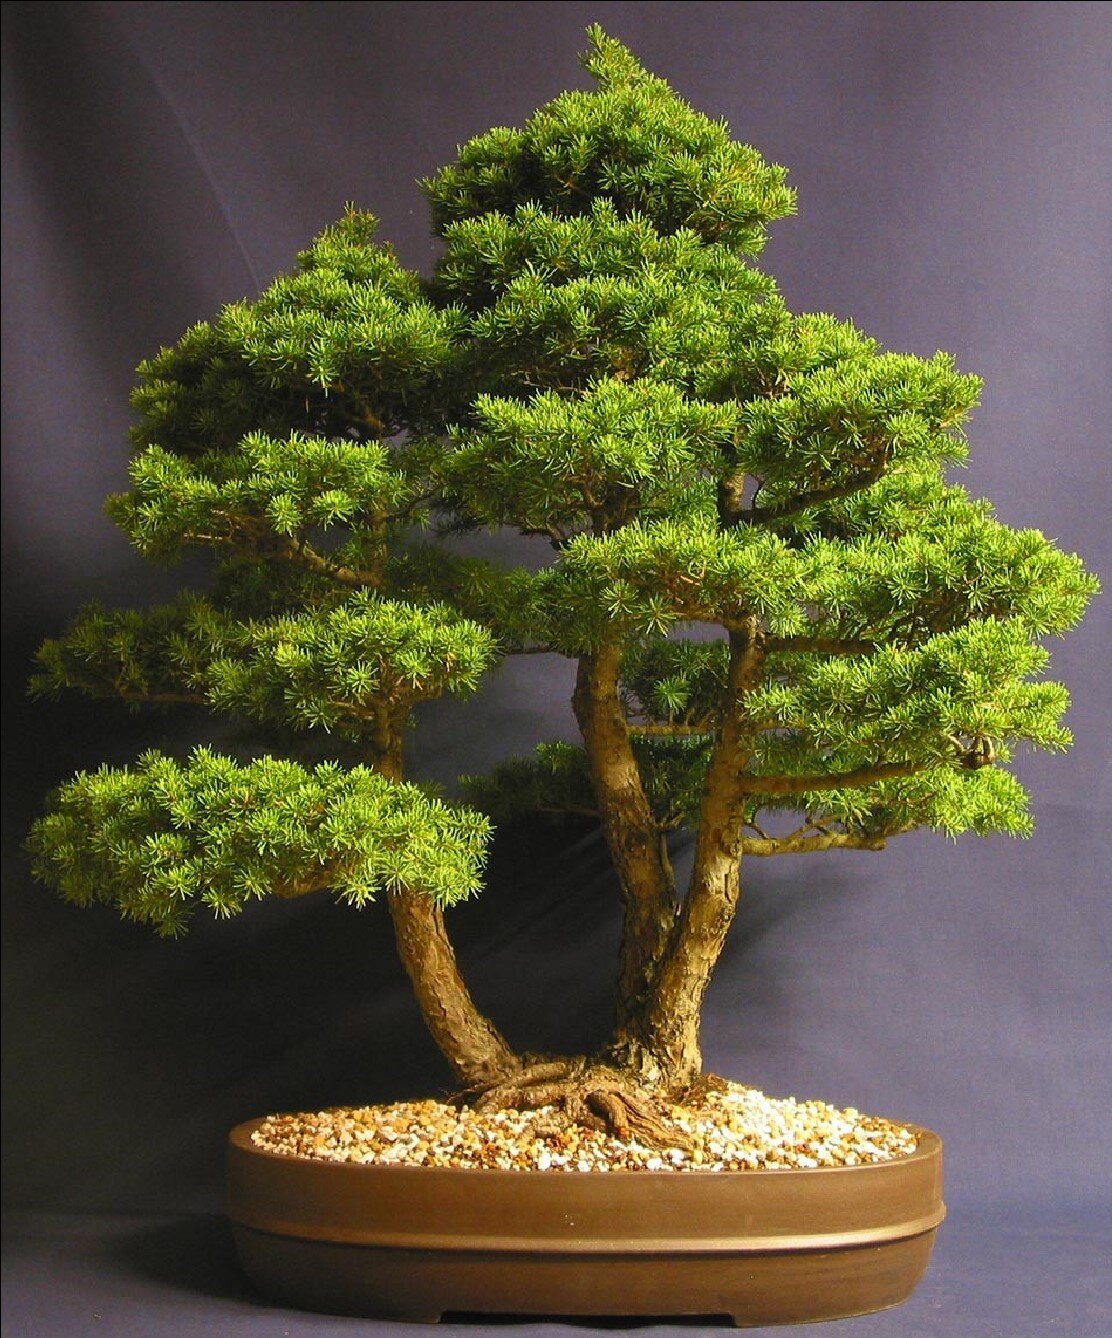
Freeing the tree from the pot was a huge challenge and Edris used just fir bark and lava for soil, what we all at BSOP used at the time. When I did get it out of the pot, it was literally a brick. This was my first instance of using a reciprocating saw on a bonsai root ball. To get into a new pot and free up some space for new soil, I used the saw to cut about a ¾ inch slab of packed mud and root off the bottom. When she saw the result, she was amazed that I was ever able to get it into the pot. The result is what you see in the first photo, from 2004. Just beginning my studies with Boon, you can see one of the very first uses of “Boon Mix” in Portland, with lava, pumice, and akadama. 

April02.png

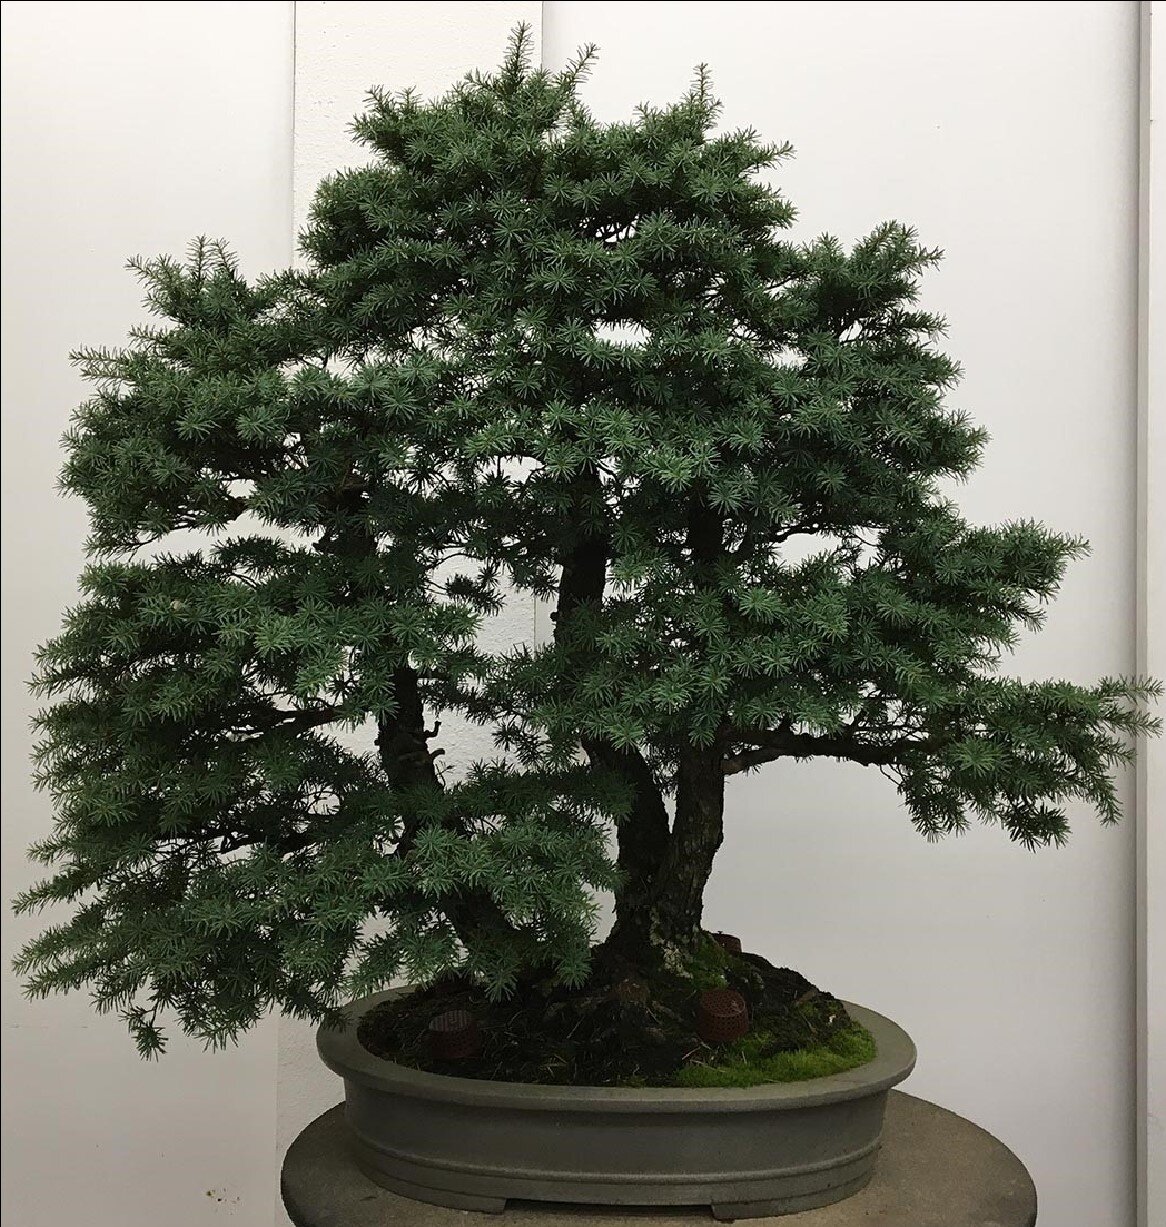
Now that I had the tree in a new container, my next mission was to style the tree. Edris didn’t employ too much wire in her bonsai training, but I obviously do and you can see the results of the first training in the 2006 photo. The structure was set and improved with the foliage fairly well balanced and thinned out. Mind you, the tree has probably already been a bonsai for at least twenty years at this point. Then it began to fill back in and was shown at the Japanese Garden Show at least once during this time period. 

april03.jpg

From here, I began to acquire more and bigger trees that took much of my available time. I realized that, although I had initially fallen in love with this tree, the trunks were all of equal size and had relatively little movement, leaving the bonsai a bit static, and to me somewhat boring. Then the worst thing that could happen struck. I simply didn’t know what to do to further the design of the tree. I was at an impasse. That was disaster, because I then started to lose a little interest and then I didn’t pay enough attention to the tree. As a result, the wire started cutting in and the tree started outgrowing its pot. Notice in the 2013 photo that the tree is growing roots up out of the pot – those coils you see on the surface. The top of the main tree was dying off, being strangled by the wire. At this point, Lee helped me unwire the tree during one of the Japanese Garden Shows. But I still did not know what to do. 

I did know that it needed to be repotted, as the tree had lost percolation, the ability to accept water. That nice big root base and compacted soil was preventing it from taking in water, so its health started to decline. I got the idea to incline the group to make them slanted to start to get more movement. So being who I am, I tried to stuff it into an even smaller pot and change the angle at the same time. Just the thing to do when is already suffering, eh? I really had to work the root ball and I barely coaxed it into staying healthy. But I still hadn’t really solved the percolation problem. I was trying to soak and soak the tree to get enough water in.

april04.jpg

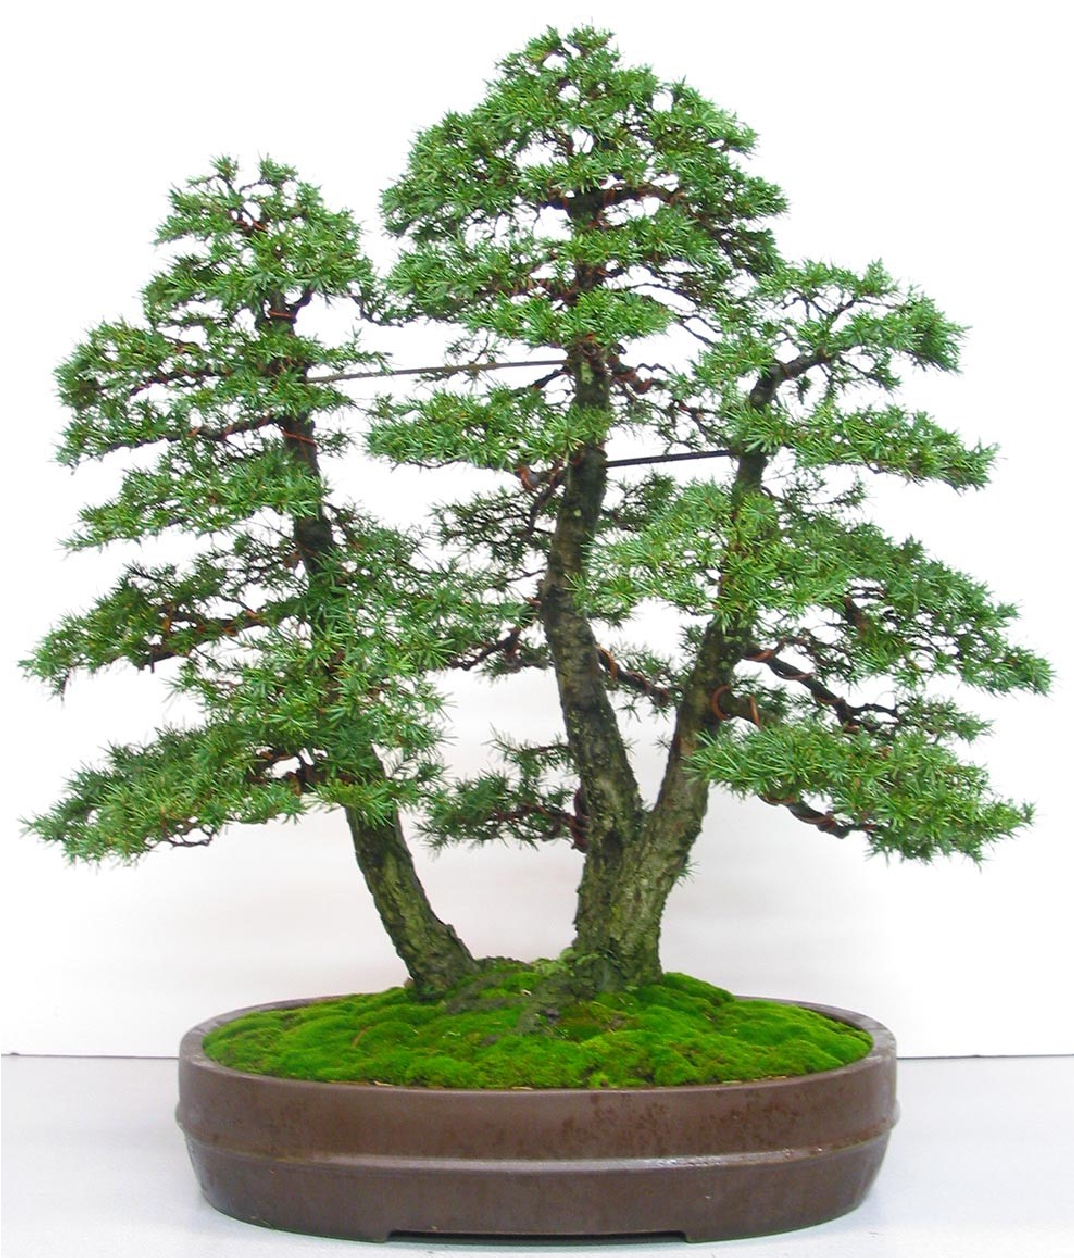
Then I hit on the idea of a rope dam. See the “Dam It” article from September 2017 on this very  tree. You can see I am still using it in the last photo here. 

After that, the tree was still struggling, but the rope dam helped immensely. In 2018 I pruned out all of the weak and dead branches so that the rest could get stronger. In March of this year it went through a new restyling. I slanted the trunks even more and rotated the group about 10 degrees so that the left, lead tree was significantly in front of the others.  The trunks have gained in girth and texture over time, so I decided that any improvement I would attempt there would only damage the best qualities of the tree with little gain. 

There were no big bends to accentuate, just a soft and gently meandering quality, and that wonderful base. I haven’t seen a hemlock with such a developed base, and it is by far the best quality of the tree. Once I had the tree tilted, my wife gave me the best feedback, as she always does, and that was to swap the priorities of the number 2 and 3 trees respectively. The left tree had been number 2, but because of the tilt, it was now almost even in height with the number 3. Why fight it? I shortened the left trunk and lengthened the right which made a lot more sense.

I began the process of styling the branches without any clear idea of where I was going. It took quite a bit of time and courage to wind my way through. I worked mostly on the left tree first, then to the main tree. From there I sort of stair stepped in chunks from left to right, working up each tree. I was able to be very disciplined for once and worked on only the main branches, and maybe a secondary or two, to see what the structure was going to be before getting caught up in any fine detail. 

I cut off many, many branches and made not a few into jin. Those tops that died had all been wired into shapes, so they made nice, attractive jin now. I think that I cut about 60 -70 percent of the foliage off. After awhile, and before I finished the top, I began to wire and style the secondary and tertiary branches to get a better idea of the movement, length, and density that I was achieving. I know that hemlocks will bud back decently, so I was not too worried about generating more foliage. It won’t happen overnight, but quicker than I can imagine, as I found out the hard way before. The photos of the Front and Right Side give you a better idea of how the structure plays out. There is a new Vicki Chamberlain pot awaiting in the wings for next year, when it has recovered from this operation. 

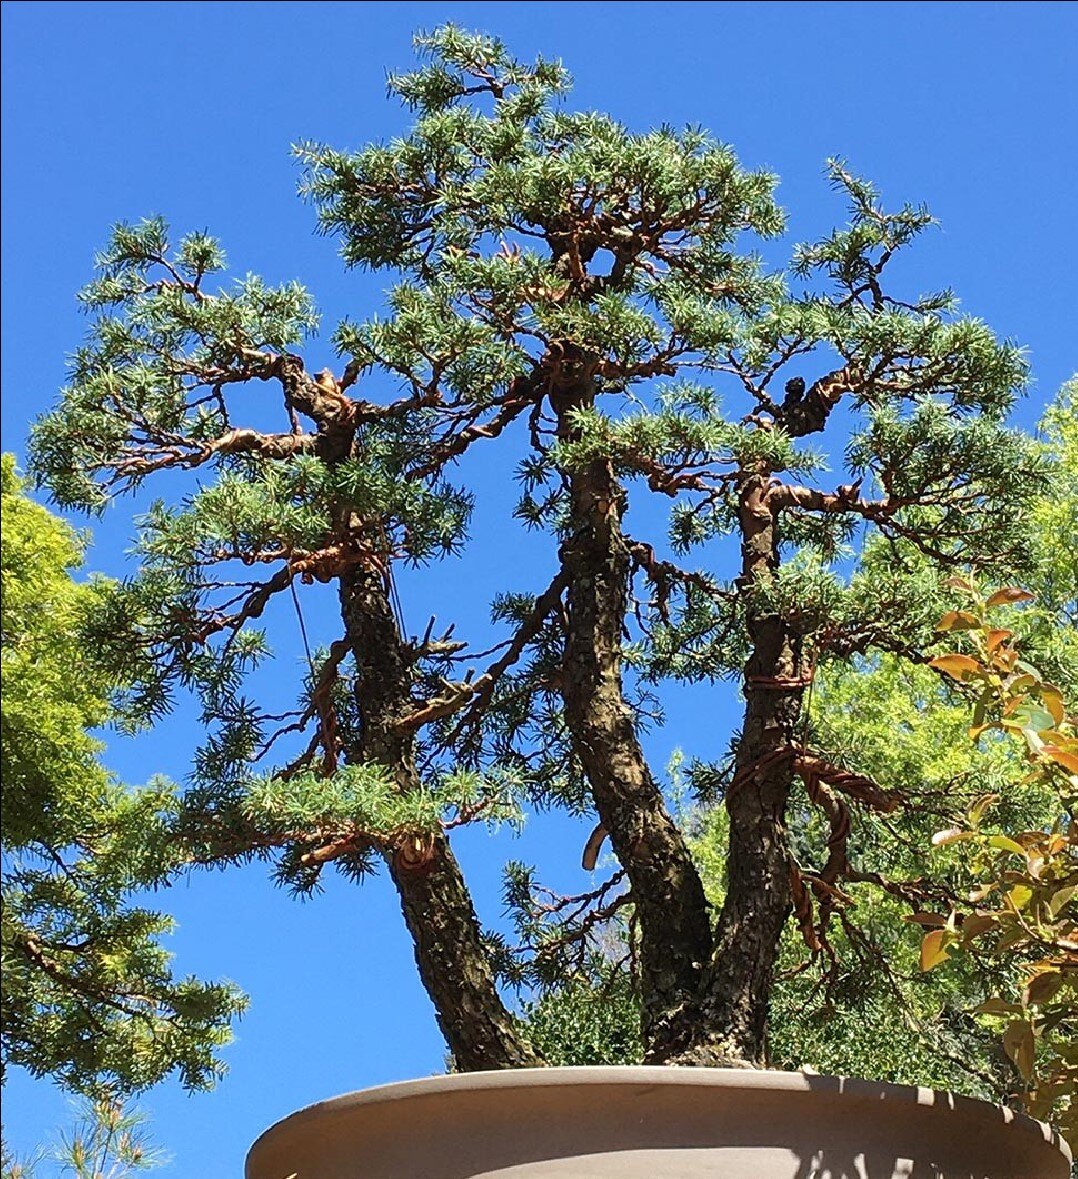
I didn’t feel like the final photos really did the tree justice, so I took another from the patio, looking up into the trees.  From here, you get a little bit more of an idea of what I told my wife Lisa. This is the first time I had ever created something where I felt that I was standing in the midst of a forest. When she challenged that thought, I clarified to say that unlike most bonsai that bring us to a solitary place on the mountain where a tree is surviving the rigors of nature, this composition puts me squarely in an alpine forest, with the light dappling through. 

april06.jpg
april6.jpg
april07.jpg

I now feel like I have come full circle with this unique tree, propelling it forward to something beyond what maybe Edris herself had envisioned. It has a way to go in this current iteration, but it will be there soon and I can share it with you all. I feel somewhat now, that I have redeemed the trust that Edris placed in me so many years ago.

Scott Elser

Annual Repotting Update

Click for Branch Tips index

It seems that each year since I started this column, over six years ago, that I have written about repotting in the Spring. Since repotting is such an essential part of our bonsai regimen, I thought that I would recap a few things and maybe pass on a few new tips. I just finished teaching several workshops specifically on repotting, with one more to go. Seeing a few common misconceptions, and some really good practices brought a few things to the forefront of my mind. I am sure that you are well into your repotting season by the time you read this. I started just last week – about March 1 on my trees.  

The first point to consider that this is the only time that you get to work on the roots for at least two years. That is for deciduous. For conifers it might be 5 years. The work that you do now has to last the tree for that period of time. We have several times to correct branch structure by pruning, wiring, etc… during any one season. However, this is the only opportunity that we have work on the roots, correcting flaws, changing the soil or container and setting up the health and growth of the tree for the next several years. It’s worth getting it right, to the best of our ability and knowledge.

First and foremost is the aftercare, so I am starting at the end, rather than the beginning. Make sure that you can keep any tree that was repotted this season from freezing, or at least the root portions. It’s also best to be able to keep them out of the rain for several weeks until you see the tree starting to use up the moisture in the container. That means that it has recovered and is ready for the transition to our great Pacific Northwest spring weather. Rain.  

For the first time in 30 years of bonsai, I built a heat bed to facilitate the recovery of plants after repotting. I mention the 30 years, because it is not in any way essential – I have made it fine this far. However, I can tackle the aging and declining root balls of some very old, collected trees with confidence. I started that process last year with great success and am now moving onto harder specimens That may be the subject of a future article. What makes my heat bed a little different is the fact that it is not in a greenhouse, but just out in the open on my patio. I love it already after just one week.

Next up is, have a plan. Do you have all of your soil components sifted and/or mixed and ready to go. Do you have the pots? More importantly, do you have the time? I am finding that just taking a pine from a six-inch pot up to an eight inch, with pruning, etc… is taking me about half an hour at cruising speed. I can’t seem to do a medium size tree in less than two hours. And since most of my trees are larger, you can do the math.  

If you run short on time, wrap the root ball in a wet towel and finish it later – within a day. Or you can heal it into a mound of something you might have, like old soil, bark dust, etc… Just make sure that it’s moist. Once you have the tree popped out of the old container, work on the new one before you start on the root ball. The less time your tree is out in the air, the better.  

If it is going back into the same container, take time now to rinse it out and let it drain and dry. If you know what pot you are going to use, put the drain screen in. The point really is to be looking ahead at what you are going to need to do to finish the repotting. Do you need to sift more top dressing? Do I need chopsticks of a different size? You get the idea.  

My next point is to be gentle. Use a root hook only when necessary and with great care. Slow going with chopsticks or angled tweezers is much easier on the tree. The soil should be moist but not wet. Handle roots with care. You can decide later what to cut off, but if you mangle them, the choice is made for you. And remember that we don’t want to bare root a conifer. It’s chances of surviving, let alone thriving, go down really fast. Also remember that you don’t necessarily have to cut roots to fit them into the pot. If you feel that you need to keep more roots for the health and vigor of a tree, you can simply fold them gently into the pot and address them in another few years when you have more root mass to utilize.

What soil you use is quite the conundrum and I am always seeking to improve what I have for each tree. There is no doubt of the effectiveness of Boon mix for bonsai, a 1:1:1 mix of Lava, Pumice, and Akadama screened to between 1/16 and ¼ inch particle size. But it can be tweaked. And a lot. Take out the 1/8-1/4 for shohin, or the 1/16-1/8 for trees that like it a little drier, like mountain pines. But there’s more. I have mentioned in the past that we can to use up to 100% Akadama on deciduous trees. I am getting mostly favorable results with that – better than the standard mix.  

But then there is Michael Hagedorn who favors just Pumice and Akadama, and our own Dennis Vojtilla that uses Lava and Akadama. They are leaving one component out and you can hardly argue their practice, looking at their trees. So, experiment on what works for you. I just had a workshop with the Eugene club, and their president, Tom Fincel (An outstanding bonsai artist and even better person to get to know) had a large container each of sifted Pumice and Akadama (A student of Michael’s) with which he could easy mix up whatever proportions he likes for any particular tree and I really feel myself gravitating to that approach.

The last thought that I leave you with is what was hammered into me (albeit it gently) by Boon. Neatness counts. It carries through the whole process. It starts with the preparation of the pot. Make sure the screens are fastened neatly into a clean pot. My screen clips are always oriented perpendicular to the front of the pot to offer the lowest profile, so no one sees them hanging down in a show. The tie down wires likewise, running front to back instead of side to side, which uses less wire and is usually hidden by the pot’s feet. I have to do all of this anyway, so it really is not any more time to make it tidy. Why would you tie a crooked tie, or leave your shoes half tied?  

On a finishing note, make sure that you do not mound the soil too much. This is a consistent trait with beginners. Level off the soil where the roots start and taper it down to where you have a good ¼ inch lip around the edge of the pot. This not only looks good, but makes it so that the water stays in the pot when you water.

Happy repotting.  Scott Elser