
Way back in October during our first of the three part Pine series, I introduced this Ponderosa Pine to you. The material was raw, in that it had never really been styled. I worked on one major bend many years ago with Boon to make it into a cascade, and then never did anything from there. We just bent the trunk, so as soon as the raffia and rebar were removed, you couldn’t really tell that it had ever been touched.
This “Pondo” was originally collected by Randy Knight and my original thought was to graft Japanese Black Pine onto the right hand trunk to make a very forceful, masculine little tree. But there wasn’t really quite enough movement to carry that off, nor a convenient place to graft. Then my taste started to shift more towards preserving the original foliage whenever possible on wild trees, so it was left alone.
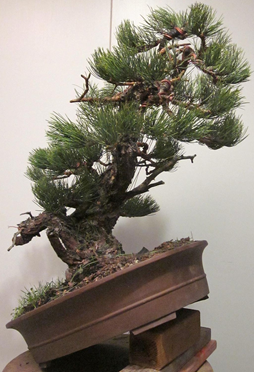
The first photo was taken in 2007, making it obvious that it had been collected several years prior. It has been out of the mountains for at least a decade. After the first year or two, it was repotted from the usual 2x6 lumber box into its present ceramic container and has not been touched since. As I remember it, probably three quarters of the soil is native to Wyoming.
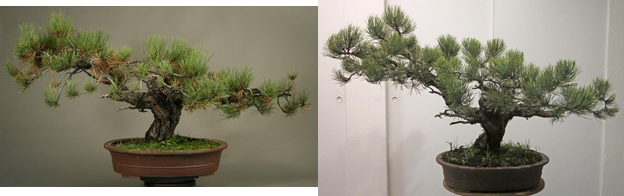
The second photo I have to offer is from this winter. Notice the difference between 2007 and 2015? Hard huh? That’s because there isn’t much. Eight years of watering and weeding has produced very little “Bonsai” growth. And here in lies my first point. Trees don’t get better by themselves. Only when we have styled a tree, optimizing the branch placement for light and orienting the foliage so that the growth can be balanced throughout the tree can it begin to really develop as a bonsai. Ponderosas grow really slowly, so this is an important point. We need to get this thing wired and styled so it can begin to really accelerate its development.
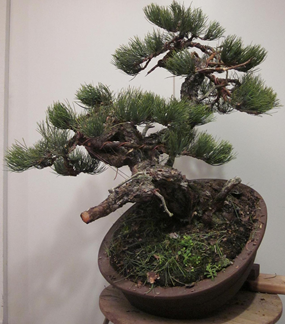
The next few photos are the before and after process of designing this tree. It was five feet wide!! It took up a lot of precious bench space. I spent several sessions over a couple of days studying the tree at various angles and coming up with some design solutions. I really liked the lower section of trunk on what was to become the back side, but it emerged from the soil with reverse taper, so not so good. I saw a way to make a stumpy, muscular semi-cascade, but Iwould be losing out on three quarters of the tree. Ultimately I came back to the same angle that we talked about in October.

Before styling (left photo). Right-side view (right photo)
Back
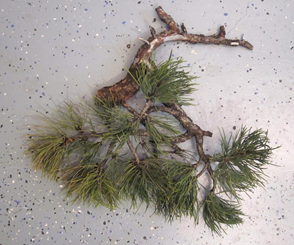
Removed back branch
Front
Left-side
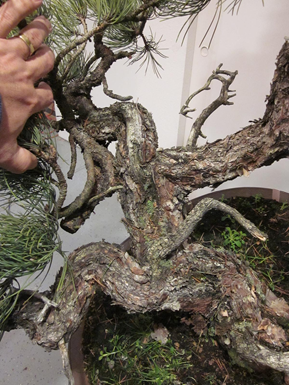
Detail
As I worked, I discovered the untamed beauty in the line of the trunk, and I really wanted to work with this. The only problem was that the foliage was not really placed in the proper positions to work with this design – the classic Ponderosa dilemma. Most all of the foliage is out on the tips. There were a lot of branches down low on the right, but the trunk was ascending on the left. To compound matters, the right hand trunk/branch took a convoluted route back on to itself several times. This is usually a feature, but not so much for this design. I had to minimize that, and I am still open on this area.
From here the design hinges on the ability to bring the left branch down and forward. Fortunately, Ponderosas are the most flexible tree that I have ever had the pleasure to bend. Most of the required bend comes at the juncture where it emerges from the trunk. Impossible to protectwith raffia there, so it ended up tearing a bit. This is the only place on the tree where I have any concern. After I wired it and then pulled it down with a guy wire, I found that the branch had some stiffness in the middle, so it did not flex with the force of the guy wire – one of the reasons it tore.
To me, the still straight branch was exposed and ugly. So then I had to go back and retrofit number four copper wire from the trunk out onto the branch. Once I did that, I really no longer needed the guy wire. With that major hurdle overcome, I was free to work on the rest of the tree. I tried my best to wire on the major branches and tried to work all over the tree to progress the design. I had to stop and work on the lower right branches to see how they could work into the design. I cut the farthest back branch that will now be a jin. The right hand branches were brought over behind the main trunk to help create depth and mass.
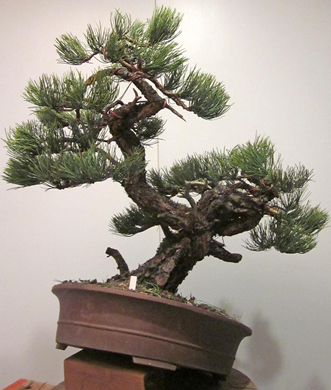
Once that was accomplished, I could then see that I really wanted the crown to extend from the left side over to the right to complete the movement. I was able to swing the top, which was constructed of two main branches, forward and around.
I very much tried to be disciplined and provide branches growing out the back for future growth, not just make it look good from the front. The new tree is now 42 inches tall and much more compact on the sides. Of special note is the fact that when we changed the angle we now have the weaker parts of the tree on the top and the stronger on the bottom. This is an ideal situation. The tree will naturally want to grow stronger on top, so I expect that region to develop more rapidly and catch up with the lower section.
Now that we have changed the angle, it’s time to get it repotted. Normally I might wait for up to a year to do this, but the tree is very stable and strong and has been in the current pot way too long. So for our February program, we will be repotting this beast on stage. Be sure to be there and give your input on the pot. Do we utilize a new one, or keep the old one? My back would really like to see it in something a bit smaller. We will focus on all the details to make a successful repot and stress the finer points of handling collected material. Be sure to join us for the fun.
Scott